
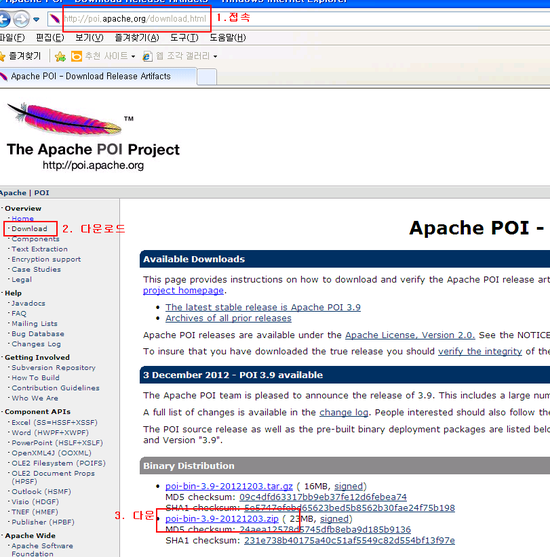
1) http://poi.apache.org/ 접속해 Download 클릭 => The latest stable release is Apache POI 3.9로
최신버전 확인 후 Binary Distribution의 poi-bin-3.9-20121203.zip 다운
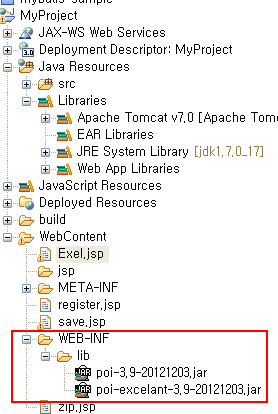
2) zip파일 풀어주면 폴더 안에 아래의 두가지 jar파일을 해당 프로젝트의 /WEB-INF/lib에 추가시켜준다.
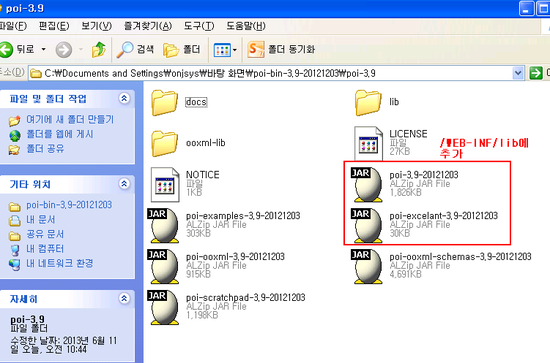
아래와 같이
3) 다음 예제 돌려서 D드라이브에 myFirstWorkBook 라는 엑셀 파일이 들어갔는지 확인
<%@page import="org.apache.poi.hssf.util.HSSFColor"%>
<%@ page pageEncoding = "EUC-KR" %>
<%@ page import = "java.io.*, org.apache.poi.hssf.usermodel.*, org.apache.poi.poifs.filesystem.POIFSFileSystem" %>
<%
try{
//하나의 엑셀 파일에 해당하는 Excel Workbook 생성
HSSFWorkbook workbook = new HSSFWorkbook();
//Sheet 생성
HSSFSheet sheet = workbook.createSheet("first sheet");
//생성한 Sheet의 인덱스, 이름을 설정
workbook.setSheetName(0, "시트1");
//Sheet 행을 하나 만든다. (rownum 인덱스 지정)
HSSFRow row = sheet.createRow((short)0);
//Sheet 셀을 만든다. (column 인덱스 지정)
//행에 셀을 3개 만든 후 값 대입
HSSFCell cell1 = row.createCell((short)0);
//셀의 폰트 지정하는 클래스
HSSFFont font = workbook.createFont();
//셀의 스타일 지정 클래스
HSSFCellStyle cellStyle = workbook.createCellStyle();
cellStyle.setFillBackgroundColor(HSSFColor.BLUE.index2);
cell1.setCellValue("number1");
cell1.setCellStyle(cellStyle);
font.setFontHeightInPoints((short)14);
font.setFontName("바탕체");
font.setColor((short)10);
HSSFCell cell2 = row.createCell((short)1);
cell2.setCellValue("number2");
HSSFRow row1 = sheet.createRow((short)1);
HSSFCell cell3 = row1.createCell((short)0);
cell3.setCellValue("number3");
FileOutputStream fileOutput = new FileOutputStream("d:/myFirstWorkBook1.xls");
workbook.write(fileOutput);
fileOutput.close();
out.println("Excel File 생성 OK");
//엑셀 파일 불러오기
POIFSFileSystem fileInput = new POIFSFileSystem(new FileInputStream("d:/myFirstWorkBook.xls"));
HSSFWorkbook workbook2 = new HSSFWorkbook(fileInput);
HSSFSheet sheet2 = workbook2.getSheetAt(0); //시트 생성
HSSFRow row2 = sheet2.getRow(0); // 행 생성
for(int j=0; j<=sheet2.getLastRowNum(); j++){//행 수만큼
row2 = sheet2.getRow(j);
for(int i=0; i<= row2.getLastCellNum()-1; i++){ // 열 수만큼
HSSFCell cell4 = row2.getCell((short)i);
System.out.println(cell4); //값 출력
}
}
}catch(Exception e){
out.println(e);
}
%>
<!DOCTYPE html PUBLIC "-//W3C//DTD HTML 4.01 Transitional//EN" "http://www.w3.org/TR/html4/loose.dtd">
<html>
<head>
<meta http-equiv="Content-Type" content="text/html; charset=UTF-8">
<title>Insert title here</title>
</head>
<body>
</body>
</html>
[출처] 예제: JAVA, JSP에서 엑셀 파일 다루기|작성자 Ww
'JSP > Excel 다운관련' 카테고리의 다른 글
| [JSP]엑셀 excel 다운로드 파일 만들기 (한글깨짐, 숫자 포함) (0) | 2015.03.09 |
|---|---|
| http://hyunssssss.tistory.com/category/?page=5 (0) | 2015.03.09 |
| [JSP] jsp 페이지를 엑셀|워드|한글로 다운로드/실행. (0) | 2015.03.09 |
| HTML을 지원하는 Excel과 Word (0) | 2015.03.09 |
| Java Servlet & JSP API 개발/코딩 (0) | 2015.03.09 |
| JSP 기본(내장) 객체 - response (0) | 2015.03.09 |
| Content-disposition 속성 (0) | 2015.03.09 |
| html excel 추출 하기.& Jquery excel 추출 하기 (0) | 2015.03.09 |

nineDeveloper
안녕하세요 현직 개발자 입니다 ~ 빠르게 변화하는 세상에 뒤쳐지지 않도록 우리모두 열심히 공부합시다 ~! 개발공부는 넘나 재미있는 것~!